5.3.2 - DISPLAY CONTROL Display Output to TV in Windows 3.x
Display output to TV is possible by connecting a video cable from the Composite or S-Video jack on the back of the adapter card to the Video-in jack of your TV set. The default setting of your adapter card is set to output to CRT only. (See jumper #JP14), however the setting to CRT or TV can be selected by software using the 'Display Control' utility. When the adapter card is set to this mode, only the Windows 3.x and Windows 95 drivers will work correctly. All other drivers such as DOS driver will work only in CRT mode. The 'Display Control ' utility allows the user to select/deselect UnderScan, Interlaced; to adjust Screen Shift; and select either CRT or TV as the device type.
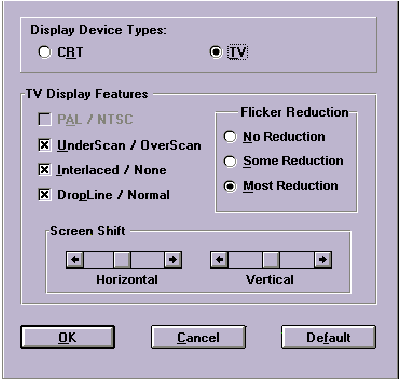
Select "UnderScan" to be able to see the entire graphic/video screen on your TV set. If this is not selected, graphic/video screen will be partly covered by the edges of the TV monitor case.
If the TV set screen flickers excessively while in the output-to-television mode, un-check "Interlaced" or check "Most Reduction" to reduce flickering on TV.
The Screen Shift bar adjust the horizontal positioning or vertical positioning of display of your TV set.
5.3.3 - DPMS (DISPLAY POWER MANAGEMENT SIGNALING)
The POWER MANAGEMENT program is designed for energy-saving monitors that conform to the VESA( Display Power Management Signaling (DPMS) standard.
WARNING: THE USE OF THIS PROGRAM IS NOT RECOMMENDED FOR MONITORS THAT DO NOT SUPPORT THE VESA DPMS STANDARD.
The program offers three power-down modes
- Standby (minimum power savings)
- Suspend (substantial power savings)
- Off state (maximum power savings)
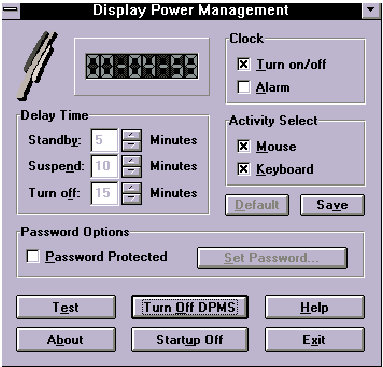
The program monitors for mouse and/or keyboard activity. When activity is not detected for a specified delay period (controlled by the Delay Time parameter), the program signals the ProVidia9685( to enter the selected power-down modes.
The Display Power Management program offers several options to customize the DPMS operation:
Delay Time
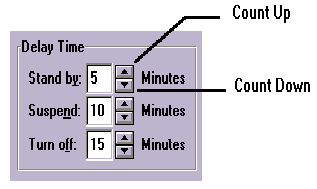
The delay time to enter each mode can be set by entering the value (in minutes) in the Delay Time parameters. Values can be entered by either clicking on the count-up or count-down button, or by clicking on the number, deleting it, and typing in the desired time in minutes
Activity Select
The Activity Select option selects which activity the program senses
in order to restore the display to the monitor. For example, if both
mouse and keyboard are selected, then either activity will re-establish
the powered down signals.
Password Option
The Password Option sets up a password to get back onto the screen.
- 1. A password is set up by first CLICKING on the box marked PASSWORD PROTECTED or by PRESSING ALT + P (this is confirmed by the presence of an "X" in the box).
- 2. PRESS ALT + S or click on the box marked SET PASSWORD.
- 3. TYPE in the selected password (twice) and SELECT OK, or PRESS ENTER.
Clock
Turning on the clock enables the digital count down display.
Alarm
If the Alarm option is enabled, then the last 5 seconds of countdown to Stand by mode is synchronized with beeps from the PC speaker.
Startup On/Off
This option installs the Display Power Management program onto the Windows Startup file, so that DPMS is active upon entering Windows.
Default
The default button sets all parameters back to the factory default values.
Test
The test feature is used to give a demonstration of the DPMS power down function.
Save
This feature is used to save all the current settings.
Once all settings are selected, the program is activated by pressing ALT + O or by clicking on the box marked Turn On DPMS.
5.3.4 - UNINSTALL DISPLAY DRIVERS
The UNinstall program enables the user to safely delete specific display drivers or an entire display driver set.
To remove an entire Display Driver Set, complete the following steps:
- Using the arrow keys or mouse, SELECT the Display Driver Set that is to be removed (the set to be deleted should be high-lighted).
- Once the desired Driver Set is selected, simply SELECT the Delete button or PRESS ENTER.
NOTE: The UNinstall program will not permit the deletion of a Display Driver set that is currently used.
To remove an individual driver from a Display Driver Set, complete the following steps:
- Using the arrow keys or mouse, SELECT the Display Driver Set that is to be removed (the set to be deleted should be high-lighted).
- Once the desired Driver Set is selected, CLICK on the Enter button. This will call up a list of available display drivers.
- SELECT the display driver to be deleted by using the mouse or the up/down arrow keys to scroll through the list.
- CLICK on the DELETE button or PRESS ALT + D to delete the selected display driver.
5.4 - DOS/Utilities Driver Installation
To install Windows NT 4.0 driver, or DOS drivers for MSWord, Symphony, Lotus 123, Quattro Pro, Ventura, AutoCAD, Gem DeskTop , WordPerfect 5.1 & 6.0 and Utilities, please follow the below steps:
- Insert the driver diskette 'DOS/Utility/Windows NT 4.0' in drive A:
- Go to drive A:
- [Type] A:\README [Enter]
- Select a drive where you want your desired drivers copied to.
- A main menu appears as below, please select
- 'A' to browse the driver diskette contents,
- 'B' to list utility programs provided by TRIDENT 9685 ,
- 'C' to get instructions for installation your desired drivers.
| DRIVER/UTILITY Version UX6.5 (06) 09/14/96 |
A. Contents
B. TVGA Utilities
C. Display Drivers |
| Select a letter to continue: ( ESC to Exit ) |
Note : The Utility programs are stored on your hard disk under the directory \tvgautil\utility.
5.5 - Windows NT 4.0 Driver Installation
Windows NT drivers are included on Windows NT 4.0 driver diskette of this package. They are located in the \NT40\ sub-directory. Please follow the below procedure for installation.
1. Run the Windows NT display Setup program located in the Control Panel, Main group.
2. Select "Change Display Type..." button from the Display Settings options.
3. Select "Change..." button from the Display Type options.
4. Select "Other..." button from the Select Device options.
5. Insert the Windows NT 4.0 driver diskette in drive A:.
6. Windows NT will prompt you for the correct path, and Enter A:\NT40 in the command line.
7. Choose "Trident Accelerator" from the list of drivers.
8. Restart Windows NT. Windows NT will start up with 640x480x256 mode using the Trident drivers.
9. Choose desired resulotion, color depth and refresh rate from the Display Setting applet, and click OK.
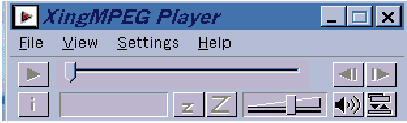
5.6 - XingMPEG Driver Installation
XingMPEG Drivers and Utilities are necessary for playback of .AVI, .DAT and .MPG files for MPEG, Video CD and Video Conferencing purposes. Versions of the latest XingMPEG software for Windows 3.1x and Windows'95 are included in this package and installation procedures are contained on the same diskette in a readme.txt file.
DCI Drivers are required under Windows 3.1x to run MPEG software, and are included as part of the included Windows 3.1x Driver.
DirectDRAW Drivers for Windows '95 are required to run MPEG software and are included as part of the included Windows'95 Driver.
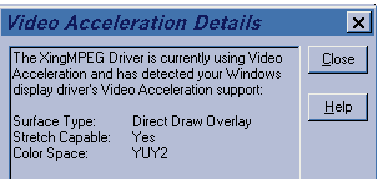
To check what driver your system is running under there is a Diagnostics program in the Xing software which will show you which drivers you are running under. After installation Run... the Xing software and then choose Settings... and then choose Diagnostics...
Then choose Video Mode and then following screen will appear showing you what type of Driver you are running under.