Möchten Sie dieses Handbuch drucken ? Wenn ja, verlassen Sie jetzt bitte die MMCD, starten Sie den Dateimanager (Win3.x) oder Explorer (Win 95) und doppelklicken Sie auf die Datei "Readme.txt", welche sich auf dieser CD-ROM befindet. Hier finden Sie heraus wie...?
Internet Phone Kit User's Guide
SECTION 1 - INTRODUCTION
Thank you for purchasing the iDEMA Internet Phone Kit. This kit enables you to transform your existing interent-linked computer in to a communications tool that is perfect for home, business, conferencing or study applications. It allows you to talk over the internet to family, friends and colleagues at a fraction of the cost of standard IDD, as well as supporting true real-time application sharing at many levels.
Internet Phone
Actually talking to people over the internet requires the necessary software and hardware as add-ons to your existing internet-linked computer. These add-ons are Microsoftź NetMeetingTM software, a full duplex Plug 'n' Play sound card (full duplex is necessary for two-way communication, rather than half duplex which only supports 'walkie-talkie' type conversations), and a headphone / microphone set which allows your hands to be free for typing on the 'Whiteboard' or 'Chat' options, and also provides clear & private communication.
Chat
Chat is a application which allows you to chat in 'typed' conversations to other internet users.
Whiteboard
The Whiteboard application is very similar to 'Paintbrush' in Microsoft Windows 3.1/95 and allows you not only to type over the net, but also to draw and paint.
Application Sharing
NetMeetingTM is a true breakthrough in application sharing programs. It allows you to make any file open to as many people in the conference as you like, and all user's can take control and even add to that document - In real-time.
Kit contents
- Microsoftź NetMeetingTM & Microsoftź ExplorerTM software for Windows'95
- Full Duplex Plug 'n' Play 16-Bit stereo sound card
- Stereo Headphone / Boom Microphone set
- Willowpond Sound Card Software Utilities
SECTION 2 - HARDWARE INSTALLATION
Sound Card Installation
- Locate a free 16-bit ISA slot in your system. These slots are usually black in color.
- Remove the metal bracket from the back of the system case adjacent to this slot and keep the screw.
- Carefully insert the sound card into the free slot, inserting at a slight angle and then pushing firmly in place. Do not touch the gold plated contacts of the card as this may cause bad contact during operation.
- Using the screw from point (2) screw the card bracket into place, keeping it secure.
- Attach the Audio Cable from the CD-ROM Drive to the relevant connector on the sound card (check the sound card manual).
- Connect the IDE ATAPI cable from the CD-ROM Drive to the relevant connector on the sound card or motherboard (similar to the CD-ROM, the sound card or motherboard will have Pin "1" indicated. Make sure the IDE cable with the colored strip connects at Pin "1").
Note : CD-ROM Connection
i) The ATAPI CD-ROM must connect to the secondary IDE Port on the motherboard.
ii) If no IDE port available on the motherboard, then connect ATAPI CD-ROM to the sound card
- Close the system case and attach the power cable again. Hardware installation of the CD-ROM and sound card is now completed.
Headphone / Microphone Installation
- The headphone / microphone set contained in this package has two standard mini-jack connectors. One for the stereo headphones, and one for the microphone.
- Connect the headphone jack to the 'SPEAKER OUT' connector of your sound card
- Connect the Microphone jack to the 'MIC IN' connector of your sound card (please refer to the sound card manual for locations)
Warning :Loud volume can lead to permanent hearing damage - To avoid this first turn down all the volume levels of your system in hardware or software before using the headphone/microphone set, and then adjust to a level comfortable for you.
SECTION 3 - SOFTWARE INSTALLATION
3.1 Sound Card Driver Installation
Before using your sound card you must first install the necessary software drivers for the type of Operating System you are using (i.e. DOS, Windows 3.1x / Windows '95 / Windows NT etc)
Please refer to the sound card's relevant user manual located on the CD-ROM contained in this package.
3.2 Microsoftź NetMeetingTM Installation
Microsoft NetMeetingTM runs under Windows '95 and Windows NT. Please run the included 'MMCD' CD-ROM in this package, and go to the NetMeeting Page. Here you can choose the version which best suits your application. Clicking on the relevant install button with install the program to your hard drive.
3.3 Willowpond Sound Card Utility Installation
Willowpond Sound Utilities are a set of 5 sound utilities : Media RackTM / Media LauncherTM / Presto ArrangerTM / Wave ShaperTM & WinchimeTM.. To install these utilities there is one convenient installation button located on the Willowpond Page of the included 'MMCD' CD-ROM .
SECTION 4 - NETMEETINGTM INTRODUCTION & SETUP
Microsoft NetMeetingTM is very easy to use, and contains a first class Help function to guide you through the program. However, here we shall briefly explain some of the major components of NetMeetingTM......
Opening Page
Before you start NetMeetingTM you should first dial-up to your internet provider. If you have not done this and you start NetMeetingTM then you will be prompted to dial-up automatically. When you run NetMeetingTM the following screen will appear.....
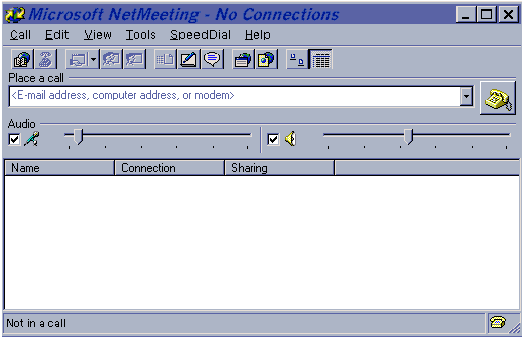
This is your opening screen, and will show you who your calling, whether they are using audio (voice) or not, their call-in name and volume controls for the speaker and audio..
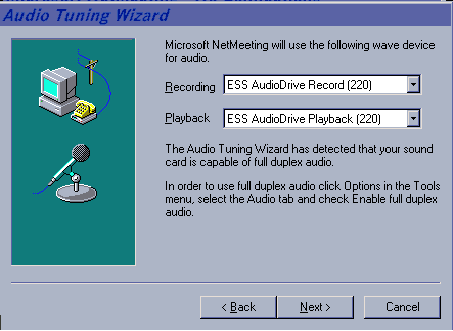
Audio Tuning Wizard
To ensure your hardware configuration is correct you should setup the audio functions to be able to work with internet phone. To do this choose Tools - Audio Tuning Wizard. The Audio Tuning Wizard allows you to setup the software ideally for the specific hardware you're using. First, Audio Tuning Wizard will automatically detect your sound card type and determine whether it is half or full duplex.
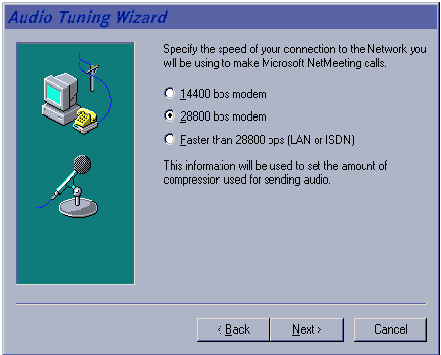
Modem Speed Settings
By clicking on Next NetMeeting will detect what speed of modem you are using
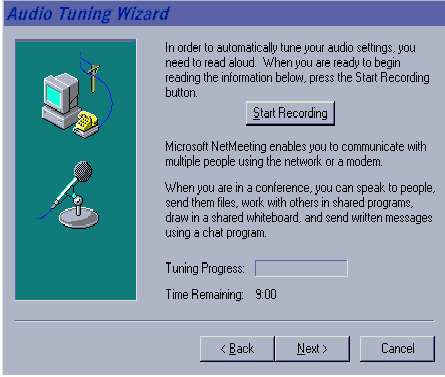
Microphone Sensitivity Settings
Clicking on Next will bring you to a screen where you can setup the sensitivity of your microphone. Just click on Start Recording and read, in normal voice tone, the sentence on the screen and the software will automatically adjust the microphone sensitivity. This feature is necessary so that it avoids distortion on internet phone calls. If you experience distortion then go back to this program and record yourself again to re-set the sensitivity.
Tip : Use your normal voice tone and voice level. Place the microphone in it's normal position when you're using it. This feature of Audio Tuning Wizard is very sensitive - Wrong settings will cause distortion of your voice at the other end of the internet phone call.
Personal Information for ULS Telephone Directory
Before you dial up to a User Location Service (ULS) you need to assign yourself a user name in the information file. To do this, first enter your personal information by choosing Tools - Options - My Information.
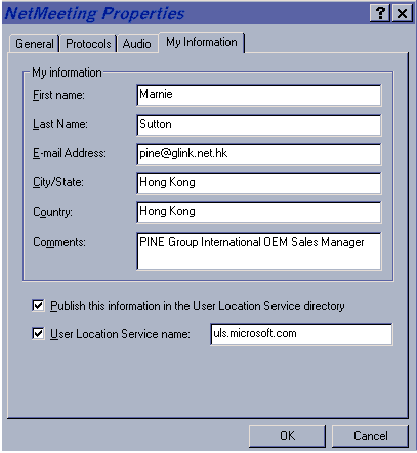
This information will automatically register in the uls directory which you later dial.
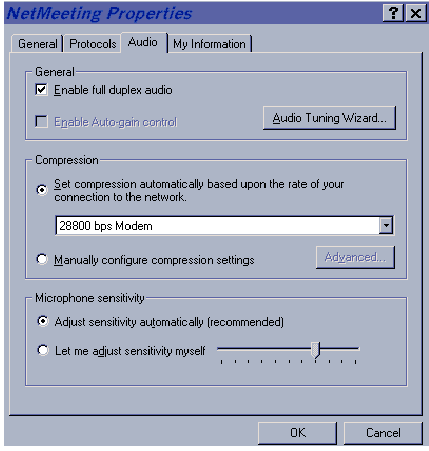
Audio Screen
The sound card included in this package supports full duplex capabilities, however you will need to 'Enable Full Duplex Audio' in the Audio settings as below to enjoy this feature. The Audio screen also gives you options for setting the compression settings and the microphone sensitivity settings.
MAKING A CALL......
To access the uls directories go to Call - Directory and the following screen will appear.
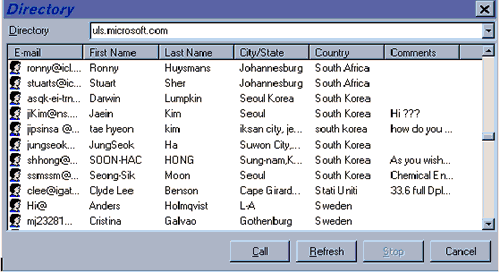
This screen is the default directory which is called (however this can be changed in the 'My Information' field). To call up any of the people listed on this directory simply click on their name and then click on Call. Other directories can be found under uls1.microsoft.com / uls2.microsoft.com, and so on..
If the person you have called is connected to their network, they will receive a message on their screen telling them that you are calling in. At this point they can either 'accept' or 'reject' the call. If they accept you will see them appear in the opening screen, and details on whether they are using audio functions or not will also appear.
At this point you should experiment with voice/audio communication, use the Chat function for typed conversations, use the Whiteboard function to paint, draw and type - or try application sharing.
Happy communicating !