Wave Editor
Introduction
Wave Editor Overview
Wave Editor lets you record, play, and edit digital audio (wave) files, and embed them into documents created by popular Windows applications.
What is Wave Audio?
Wave audio is recorded audio stored in digital format. Wave files on PCs running Windows are stored with a .WAV file extension.
When wave audio is recorded, a signal such as a voice speaking into a microphone is converted into voltage and "sampled" (or expressed as numbers representing the signal's level) thousands of times per second.
Wave Editor's Controls
Wave Editor's controls are described below:
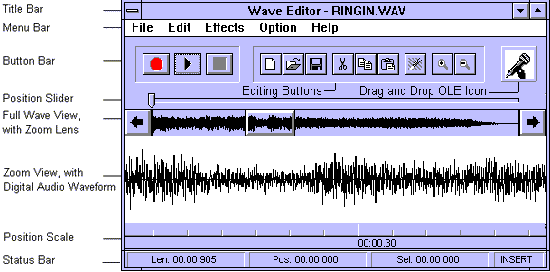
Title Bar: Displays the title of the currently loaded wave file, if any.
Menu Bar: Provides Wave Editor's functions through standard Windows pull-down menus.
Button Bar: Offers Record, Play, and Stop buttons as well as a drag and drop OLE icon for audio annotation purposes.
Position Slider: Indicates the current position in the loaded wave file. The current position is where Wave Editor starts playing when the Play button is pressed.
Full Wave View: Displays a graphical representation of the entire currently loaded wave file.
Zoom Lens: Indicates the portion of the currently loaded wave file that is shown in more detail in the Zoom View.
Zoom View: A detailed view of the portion of the currently loaded wave file under the Zoom Lens.
Position Scale: Provides a series of reference markers for use in editing the wave file in the Zoom View.
Status Bar: Reports information about the current wave file, including the data format, file length, current position, length of selected portion, and insert behavior.
Condensed View
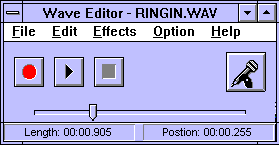
To reduce the amount of your PC display that Wave Editor occupies, you can toggle off Expanded View in the Options menu, and use Wave Editor with its Condensed user interface.
Recording Wave Audio
Recording
1. Make sure your microphone is connected and switched on.
2. If you already have a file loaded and wish to record a new file, select New from Wave Editor's File menu.
3. Click on the Record button and speak into the microphone.
4. When finished, click on the Stop button.
If you are using Wave Editor in Expanded View, you may have to wait a few seconds while Wave Editor does the necessary calculations to display the waveform.
Saving Recorded Audio in Disk Files
1. Select Save As from Wave Editor's File menu.
2. Navigate to the directory in which you want to store the file, and specify a file name. Digital audio (wave) files are stored with a .WAV file extension. Click on OK to save the file.
Choosing Record Settings
Wave Editor allows you to record audio in different data formats, for different uses. Some data formats offer excellent sound quality, while others sacrifice sound quality but require less memory and disk space.
To pick a recording data format:
1. Select the Set File Format menu item
2. Choose from among the audio data formats in the Set File Format window. The Format pick list offers a list of available audio compression formats, while the Attributes pick list lets you select the sample rate, sample size, and number of channels (mono versus stereo).
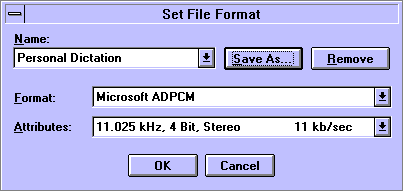
3. You can create your own audio file format style by typing a format name into the Name field and clicking on the Save As button.
Loading and Playing a Wave File
To load and play a previously saved wave file:
1. Select Open from Wave Editor's File menu.
2. Navigate among the subdirectories to locate the .WAV file you wish to load. Click on OK to select the file. You should see the name of the loaded file in the Wave Editor Title Bar.
3. To play the file, click on the Play button. To stop playing, click on the Pause or Stop button. The Position Slider moves to the right during file playing, and indicates the current position in the current file.
Editing Wave Audio
Viewing and Selecting Wave Files
When you have a wave file loaded, Wave Editor displays the full waveform in the Full Wave View window, and a portion of the waveform in the Zoom View window.
To select a portion of the wave file for editing purposes:
1. Move or stretch the Zoom Lens to cover a portion of the wave file that includes the section you want to edit. To move the Zoom Lens, just drag it along the Full Wave View window. To stretch it, move the mouse cursor over the left or right edge of the Zoom Lens until it changes into a double-headed arrow cursor; then hold down the left mouse button while dragging the Zoom Lens edge.
2. In the Zoom View window, use the mouse to select a portion of the wave file. If you click on the Play button you will hear only the selected portion of the wave file.
To select a piece of the wave file that extends outside of the Zoom View window, hold down the Ctrl key while dragging the cursor to the left or right beyond the edge of the Zoom View windows.
Applying Audio Effects
Once you have selected some or all of the loaded wave file, you can apply a variety of effects to it by selecting them from Wave Editor's Effects menu.
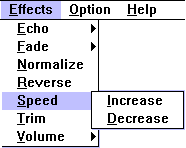
Echo: Selecting Echo displays a sub-menu of echo effects.
Fade: Lowers the volume of the selected wave file portion. Fade In lowers the start of the selected portion, while Fade Out lowers the volume of the end of the selected portion.
Normalize: Scales the waveform portion so that its loudest point reaches full scale (that is, is as loud as it can be without clipping).
Reverse: Reverses the selected portion of the wave file, so that it "plays backwards".
Speed: Speeds up or slows down the selected wave file portion. Note that increasing the speed of a wave file raises its pitch and reduces its length, while decreasing its speed has the opposite effects.
Trim: Deletes silent sections at the beginning and end of the waveform (but not in the middle of the waveform).
Volume: Lets you increase or decrease the volume of the selected portion of the wave file.
Cut and Paste Editing
To delete a portion of a wave file, either permanently or temporarily (so you can move it elsewhere using the Paste command, e.g.):
1. Select the desired portion of the wave file.
2. Select Cut from the Edit menu.
To move (or duplicate) portions of files, use the Edit menu's cut (or copy) and paste selections. To paste into an existing wave file, select the insertion point by clicking on the waveform in the Zoom View window and select Paste from the Edit menu. When you paste into an existing file, what happens depends on the Paste Mode at the time:
Insert: Inserts the audio from the Windows clipboard into the current wave file at the insertion point, and moves all audio data after the insertion point to the right, after the newly inserted data.
Cover: Inserts the audio into the current wave file at the insertion point, overwriting the existing audio data from the insertion point forward for the length of the inserted audio.
Mix: Inserts the audio into the current file at the insertion point, adding it to the data already there. Doing this, you can overlay one type of audio (speech, e.g.) on top of another (recorded music, e.g.).
Embedding Audio in Documents
About Embedding and OLE
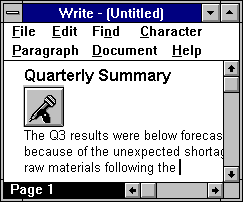
Wave Editor allows you to "voice annotate" documents. That is, you can record spoken comments using Wave Editor, and insert them as comments into documents you create using most Windows word processors, spreadsheet programs, database programs, and other applications. Windows does this embedding using its Object Linking and Embedding (OLE) technique. Each message you embed in a document is an "object".
Embedded audio objects appear as icons, or small pictures, as shown below:
Playing Back Embedded Audio
Once you've embedded an audio object into a document, it stays there until deleted. To play back the embedded object, just double-click on its icon. The application which created your document will launch Wave Editor with the audio object loaded, and automatically play the object.
Embedding Techniques
There are three ways to embed audio objects in documents created by OLE clients:
- Drag the drag and drop OLE icon into a document created by an OLE client application. The icon will appear at the document's current cursor position.
- Select Copy Object from the Wave Editor Edit menu to place a copy of the current wave file into the Windows clipboard, and then paste the object into a document using menu items (Paste, Paste Special, e.g.) of the application that is creating or editing the document.
- From within the application that is creating or editing your document, use menu items (Insert Object, e.g.; each application is different) to bring up Wave Editor and record your audio message. When finished recording, exit Wave Editor to embed the audio object in the document.