2.1 DOS Driver Installation
- Go to the MSDOS prompt
- Insert the MMCD in to your CD-ROM drive. Log onto that drive, and change directories to go to the directory app\product\2\ess1868\dos\ Then type setup
- The DOS driver installation program will appear.
- Use the arrow keys to move the pointer "[ ]" to the parameter which you want to select and then press the "RETURN" or "SPACE" key to confirm the new setting.
- If there is more than one parameter you want to change, please repeat the procedure #3 to make all the changing
- After you have finished the changing, press the "ESC" key to leave the installation program. The system will prompt you a "Make changes to CONFIG.SYS and AUTOEXEC.BAT (Y/N)?" at this time, you must press the "Y" key to confirm the system update, otherwise the installation program will not install the Sound Card DOS driver for you.
- Reboot your computer system.
Note : If you use both of the DOS and MS Windows 3.1, you should skip the installation of the DOS driver of the Sound Card. Instead, you only need to install the Sound Card Window 3.1 driver which will work for both the DOS and Windows environment simultaneously.
DMA - direct Memory Access (DMA) is the electronic channel for moving data directly between main storage and peripheral equipment without requiring processing of the data by the CPU.
IRQ - Interrupt request (IRQ) is the request for processing on a particular priority level. It is generated by the I/O device (the add-on cards).
Port address - is the address used to specify port connectivity parameters and to assign link addresses for the certain I/O device.
2.2 Windows 3.1 Driver Installation
- After running the MMCD program, go to the ESS1868 Cost Saver 3D page and click on the button named Windows 3.1x driver under the 'Install' Section on the screen. This will automatically load the Windows 3.1 driver installation program.
- When the Sound Card Windows 3.1 driver installation program appears, click "Continue" and then "Driver Installation" button to start the installation.
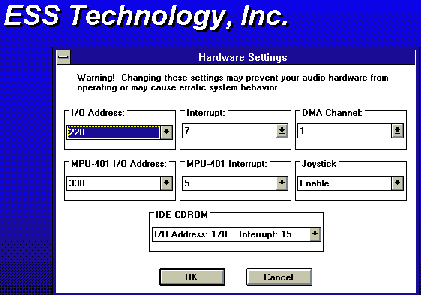
- After that, you can modify the setting to what you want under the "Hardware Setting" dialog box shown below. Click the "OK" button when you finish the modification.

- Then, click the "Reboot System" button to proceed.
- Make sure that all floppy disk has been removed from the floppy disk drive then click the "OK" button, the Windows system will be updated automatically.
2.23 WINNT 3.51 Driver Installation
- After entering WINNT (Version 3.51 or higher). Double click on the "Main" ( "Control Panel" ( "Drivers" icons.
- Click the "Add..." button
- Select the "Unlisted or Updated Driver" item, and click the "OK" button.
- Insert the MMCD in to your CD-ROM drive and then type the letter of drive and app\product\2\ess1868\winnt35\. Then click the "OK" button. (Note : If you are using Windows NT Version 3.5 then the directory location of the driver will be named as 'winnt35'. If you are using Windows NT Version 4.0 the directory will be 'winnt4')
- Click the "OK" button again.
- Under the "ESS Base I/O Address" dialog box, click the "continue" button.
- After that, you can modify the setting to what you want under the "ESS1868 Configuration" dialog box. Click the "OK" button when you finish the modification.
- For the new driver to take effect, you should click the "Restart Now" button.
2.24 Windows 95 Driver Installation
Note : Install the Sound Card into the motherboard only after the Windows '95 has already installed into the new HDD of the new system, then restart the system and follow the procedure below..
- Install the Sound Card on the motherboard, and power on the system.
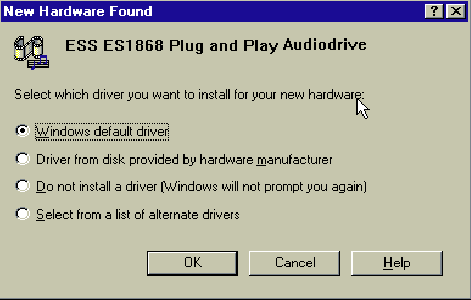
- During the Windows 95 boot procedure, new hardware will be detected as shown below.

- Select the "Driver from disk provided by hardware manufacture" item, and click the "OK" button.
- Windows 95 will then prompt a "Install From Disk" dialog box.
- With the MMCD already loaded into your CD-ROM drive, type the letter of your CD-ROM drive followed by app\product\2\ess1868\win95\ , then click "OK" button to install the relevant Windows 95 driver.
- After that, the "New Hardware Found" dialog box window will appear for gameport joystick.
- Select the "Windows default driver" item, and click the "OK" button to complete the installation of the game port driver.
- In the same way, you can achieve the installation of the Standard IDE/ESDI Hard Disk Controller. Finally, Windows 95 will ask if you want to restart system for the new driver to take effect, you should click the "YES" button.