Picasso96Mode
Picasso96Mode is the preferences tool to create and adjust display modes. It
is normally installed in SYS:Prefs. The GUI looks like this:

The GUI is divided into four areas:
- the action buttons,
- the list of settings,
- the resolution list and
- the mode list.
The action buttons
In the upper right corner you can see four drag-and/or-drop boxes
which allow you to:
- create a new object (can be setting, resolution or mode depending on
which listview you drop it into),
- copy an object to the internal clipboard for later use,
- duplicate an object and
- delete an object.
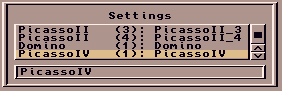
The list of settings
A setting consists of all display resolutions for one Picasso96 graphics
board. In the listview you see the currently available settings in your
settings file. The strings in the settings listview consist of the card
type, for which of possibly multiple boards of the same type this
particular setting is (normally 1 i.e. for the first board of that type)
and a user selectable name for this setting.
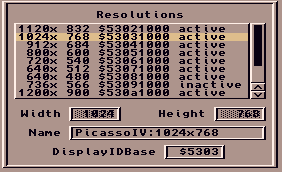
The resolution list
This list contains all different resolutions that are currently configured
for your system. You can see the dimensions, the display ids and the current
state (active or inactive). Below you see gadgets for width, height, name
and base display id. Width and height are only changeable when there is no
mode defined for that resolution. Only the upper half of the display id is
changeable due to graphics.library's display id management.
You can toggle the activation state of any entry by double clicking on it.
An inactive resolution will not be added to the system.
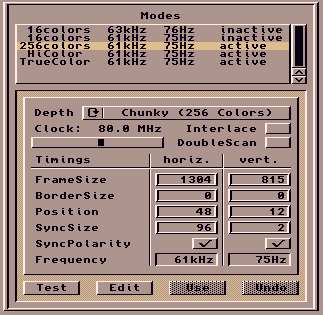
The mode section
This section consists of the list of modes for the current resolution and
the edit section for the current mode.
You can define multiple modes of the same depth type, but only the first
active mode will be used for display. Here, too, you can toggle the
activation state by double clicking on it.
Description of the edit section gadgets
- Depth
- Planar
-
if defined, screens with upto 16 colors will be planar. This
only makes sense for old boards without blitter like e.g. the
Domino. On other boards these modes are considerably slower
than chunky modes and should only be used when necessary.
Memory usage: 0.5 Bytes/pixel.
- Chunky
-
CLUT (color look-up table) based modes with upto 256 colors.
These are the fast, memory saving and very compatible modes
for all purposes.
Memory usage: 1 Byte/pixel.
- HiColor
-
when fast display is wanted but more than 256 colors are
needed for pictures, HiColor is a good choice. On modern
chip sets these modes are almost as fast as chunky but offer
near TrueColor picture quality with 65536 (16bit) or 32768
(15bit) different colors. You might even want to use HiColor
for your Workbench screen if you like to use fancy backdrops.
Memory usage: 2 Bytes/pixel.
- TrueColor
-
when fine color details are important, TrueColor with its
16 million different color shades is the way to go. But be
warned that TrueColor displays need more memory and are
considerably slower than those using HiColor.
Memory usage: 3 Bytes/pixel.
- TrueAlpha
-
some boards use 32 bits per pixel for TrueColor displays
although most of them ignore the extra 8 bits. This mode has
certain advantages but also disadvantages over the 24 bit
TrueColor modes. Writing single pixels is considerably faster
because only one longword access has to be performed instead
of three single byte accesses, but due to the increased size
of the bitmaps more memory is needed and blitting areas can
be slower.
Memory usage: 4 Bytes/pixel.
- Clock
Pixelclock of the current mode, this has direct effect on the
horizontal and vertical refresh rates of the mode.
- Interlace
Activating this flag causes the display to become interlaced,
i.e. the odd and even lines will be displayed in two different
frames thereby doubling the vertical refresh rate but resulting
in the well known interlace flicker. This might be used for
high resolution screens on boards and monitors which do not support
high horizontal refresh rates.
- DoubleScan
This flag on the other hand results in each line being displayed
twice during each frame resulting in a effectively halved vertical
refresh rate. This is normally used for screens with less than
about 350 lines.
-
Timings
Here you can see the actual values for the current mode. These values are
in pixels or lines respectively. On most boards the horizontal timings are
always multiples of eight because of historical reasons the horizontal
values are not pixel but instead so-called character clocks (i.e. 8 pixel
units).
- FrameSize
- These values contain the entire frame size including the invisible
areas during the retrace periods. They are usually about 25% larger
than the actual display size for horizontal value and about 10% for
the vertical.
- BorderSize
- This is the width or height of a visible border around the display.
It will only be visible if you set it greater zero and disable
border blanking. Usually you will set it to zero.
- Position
- These values determine the position of the display on the monitor.
- SyncSize
- These values determine the length of the respective sync impulse.
You will only have to increase it when your monitor has problems
with the default values.
- SyncPolarity
- Some monitors determine their display parameters from the polarities
of the sync signals. Unselected gadgets stand for positive syncs and
selected for negative. Negative syncs are default. If your monitor
does not allow to adjust the display to what you want you might try
to change the polarities.
- Frequency
- Here you can see the effective horizontal and vertical refresh rates
in kHz and Hz respectively. These give you a rough impression about
the validity of the current mode. The refresh rates are calculated
by evaluating these functions:
- horizontal frequency = pixelclock / horizontal framesize
- vertical frequency = horizontal frequency / vertical framesize
- Test
This button brings up a test screen with a test pattern which allows you to
check the display geometry. You can not change any of the display parameters
in this test mode.
- Edit
With this button you bring up an edit screen containing a small help text
and a window containing the same gadgets as the timing section of the main
Picasso96Mode window. In this mode you can change the display parameters,
see the new parameters and verify the result immediately. Pressing ESCAPE
leaves the edit mode discarding changes, pressing RETURN leaves accepting
changes. If you press a mouse button the edit mode is left, too, and you
will be asked later whether to accept or discard any changes.
- Use
If you changed anything in the current mode you can press the use button
to update the mode within its resolution. You will be asked whether you
want to discard changes when you select a different mode, too.
- Undo
With this button you can discard all changes made to the current mode.
If you want more informations about the details, read Sylvain Bourciers
Picasso96 ScreenMode Definition FAQ.
Usage of the drag-and-drop style interface
The way settings, resolutions and modes are handled is quite the same and
therefore I now just call them objects and explain how to use any of them.
You can create, delete or copy any object by performing simple operations
with the mouse.
- Creating a new object:
Click on the create button which is the first button in the upper left
corner of the main Picasso96Mode window. You will see that a small
rectangle with the text "New Object" will appear under your mouse
pointer as long as you keep the left mouse button pressed. When you
now move the mouse pointer around on the display you will notice
that the rectangle will move along and will be clipped if you try to
leave the window. If you are within the borders of one of the list
you will see that the text box changes. If you drop the box now, i.e.
release the left mouse button you will get a new item in the list you
dropped the object into.
- Deleting an object:
Let's assume you want to delete an object from one of the lists. All
you have to do is to click on the entry within its list and drag the
mouse outside to the left or right of the list view while holding the
left mouse button pressed. If you are too slow, the action will be
ignored and you'll have to retry. Now you will see a text box under
your mouse pointer representing the object you currently work with.
If you now drag the mouse over the delete gadget which is the fourth
of the gadgets in the upper left corner of the window and release the
left mouse button, this object will be deleted from its list. It is
now completely gone. No, there is no undo button...
- Duplicating an object:
If you want to get a copy of an object, for example to create the
matching mode for a different color depth, you drag the original
object over the third gadget in the upper left corner of the window.
Once there, you release the left mouse button and will see that a
copy of the original object will be added to the bottom of the
list you got the object from. This is now a copy of your original
object.