CrossFade
CrossFade is one of the greatest WebFX effect. This effect will allow
you to create smooth fades between pictures, creating a very eye-catching
animation.
Here there is a very smart example of CrossFade Effect:

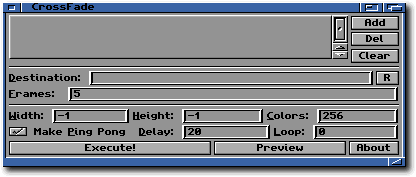
The GUI related to the CrossFade Effect is very simple to use, and will guide
you through the whole process for the creation of the animation.
Take a look at the GUI:

The interface couldn't be simpler.
- First of all, you have to Drag & Drop the
images inside the ListView at the top of the Window. If you don't like Drag
& Drop you can always use the Add gadget which will open an usual File
Requester.
- Then you have to specify the Destination File Name of the animation you are
going to create. As usual, you can always Drag & Drop an existing file, which
will be overwritten.
- With the Frames gadget, you must specify how many transition frames
will be created for the animation: please, note that this number of frames does not
include the Make Ping Pong frames that will be generated if Ping Pong
is active.
- After you have set up also the final Width, Height and Number of Colours
you are ready to press the Execute! button to create the animation.
Some Tips
- Even if WebFX is able to automatically scale the pictures for you, we suggest
you to have all the pictures of the same size before creating the CrossFade animation.
This will produce a better result.
- You can use CrossFade in a lot of ways, not just to swap pictures
here and there. For example, fading a picture with a White Box will produce
a very kind appear effects, and taking this effect to the limit, you can
produce an animation very close to this one:

- Consider also the use of Ping Pong which will allow you to save time
creating good looping animations.


