Chicken-shaped chicken pie
This is a great recipe and always impresses people who see it.
What you need:
- A picked chicken carcass or a poached chicken breast chopped into bits.
- A can of chicken in white sauce
- Some frozen petit pois
- Frozen sheet puff pastry (you can use blocks)
- milk or egg for glazing the pastry
- optional: some cochineal and annato or green food colouring
This is something I often make on a Monday night after having had roast chicken the day before. I start by picking all the remaining meat from the carcass. If it was only the two of us for Sunday lunch, we don't tend to eat the breast meat at all, so you have two lovely plump breasts for a start (oo-er! fnarr!). You could actually make this recipe without using the canned chicken, but it is actually easier to do it with a mixture of fresh and canned chicken.
Put the chicken into a saucepan with the frozen peas and a little milk and just warm it through. We need to thin down the sauce a touch because it will rethicken in the oven anyway. Season the mixture to your taste - personally, I like a touch of nutmeg in there and possibly a little bit of Dijon mustard along with the usual salt and fresh black pepper.
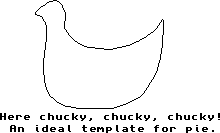
Next up is the pastry. Now it doesn't matter if you're not an artist - even a child of six can draw a chicken. In fact, if you have one, why not get them to do the drawing? Don't bother putting feet on the chicken, by the way. Here's a crap picture to show you how it should look:
 Draw the shape onto the pastry to make a shape about 10" square or as big as your baking sheet can handle. Once you have cut the chicken out of the pastry, it's probably a good idea to heat the oven up to about 180° C and prep your baking sheet. Grease it well and then put the cut out chicken shape on it. Next, score a line about a centimetre in from the edge of the chicken and cut out a strip of pastry about the same width which you should then fasten onto the chicken shape using milk or egg so that it forms a boundary wall.
Bung this into the oven for about twenty minutes or until risen about four times it's original size. Take it out of the oven and push down the middle section where you scored. You can then pour the chicken mixture into the middle of the pie, but we haven't created the top yet so hold up!
To create the top for the pie, roll out the remaining pastry and, using a bottle top or cutter about 3cm in diameter, cut out circles of pastry. You can then fill the pie with the chicken mixture and then cover it over by using the pastry circles. Start at the tail end (you may need to trim some of the circles) and work your way to the head end of the pie. Once you get to the bottom of the neck you can stop using the circles and create a headpiece. If you need to know what I mean, have a look at a Kellogg's Cornflakes packet and you'll understand. You can also add a pastry eye if you're feeling artistic.
Glaze the pie (this is where the food colouring comes in if you want to give the "feathers" an authentic(!) look), using milk or eggs and then bung it into the oven once more. Since everything has been cooked apart from the pastry on top of the pie, you can use that as your basis for when to pull it out of the oven, but you should give it at least half an hour. Luvverly!
 |  | last updated: 13th February 1997
|
 Draw the shape onto the pastry to make a shape about 10" square or as big as your baking sheet can handle. Once you have cut the chicken out of the pastry, it's probably a good idea to heat the oven up to about 180° C and prep your baking sheet. Grease it well and then put the cut out chicken shape on it. Next, score a line about a centimetre in from the edge of the chicken and cut out a strip of pastry about the same width which you should then fasten onto the chicken shape using milk or egg so that it forms a boundary wall.