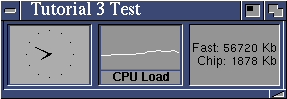
Note that we have 3 top level objects in this window: the Clock, the Layout with the load meter & label, and the memory readout. The window we just saw has them in a vertical order. Let's change that to horizontal.
Click on the Layout tab in the Layout editor. Change the Format to Horizontal. Also, change the Horizontal Spacing to 6. Note that changing the format will not change the window size, so we'll have to fix that later. Select Accept. You should now see (very tall and thin!) objects arranged horzontally. Resize the window to fix the aspect. It should now look like this.
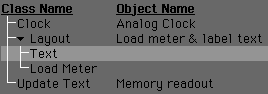
 You'll note that we changed the formatting to horzontal only for the top
level Layout. The inner Layout, containing the CPU load meter and its
label, is still set to vertical, so the label still appears below the meter.
Try editing the Layout for the window contents again, and dragging the
label text above the load meter. It must still be grouped under the same
Layout! It should look like this.
You'll note that we changed the formatting to horzontal only for the top
level Layout. The inner Layout, containing the CPU load meter and its
label, is still set to vertical, so the label still appears below the meter.
Try editing the Layout for the window contents again, and dragging the
label text above the load meter. It must still be grouped under the same
Layout! It should look like this.
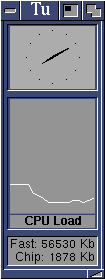
 Then select Test to view the changes. You should now see the text
above the meter, instead of below.
Then select Test to view the changes. You should now see the text
above the meter, instead of below.
You should notice when you resize the window that box showing the memory display is always the same height, and the clock and CPU load meter change height. What controls the relative height of objects?
There are several answers. One is that an object cannot become smaller than its contents. In the case of a text object, no matter how small you try to make it, it will be at least as big as the text it contains. A layout object cannot be smaller than the group of all the objects it contains. And so on.
But you can explicitly control the relative or absolute size of an object. Let's try making the CPU meter taller. Bring up the window contents Layout object editor. Click on the Layout for the CPU load meter and label, and select Edit to edit it. Click on the Object tab in this new editor box, then Appearance. You should see two sliders for Horizontal and Vertical weight.
 Normally, this weight is not an absolute number. The logic goes like
this: a Layout object contains some sub-objects. Each of these
sub-objects has a horizontal and a vertical weight. The weights of the
sub-objects are summed, and each object occupies the percentage of the
total size as determined by its weight.
Normally, this weight is not an absolute number. The logic goes like
this: a Layout object contains some sub-objects. Each of these
sub-objects has a horizontal and a vertical weight. The weights of the
sub-objects are summed, and each object occupies the percentage of the
total size as determined by its weight.
This sounds more complex than it really is, but it allows for powerful control of object size when resizing windows. Change the Vertical weight for the inner Layout to 200 instead of 100, and select Accept. Also Accept the original editor. You should now see the CPU meter get taller, and the clock shrink to accomodate it. You can resize the window to fix the aspect ratio, and it will look like the window on the right.
As an example: if a layout group contains 2 objects, each of weight 100, they will have the same size. The total weight is 200, and each has half, or 100. If you add a third object of weight 100, each will now occupy 1/3 of the space (100 / 300). If you now change one to weight 200, the total weight is (100+100+200), or 400. The two objects of weight 100 will use 1/4 of the space (100/400), and the object of weight 200 will have half (200/400). The memory text in the window for this example has a vertical weight of 1, so it is always as small as it can get, while the clock and the CPU meter are resized.
Powerful control over layout is possible in BarNone, but it will take practice to become proficient with it!.
Let's add a new object to this window. Edit the window contents. When an object is added, it will appear after the select object if the selected object cannot contain children, or as a child of the selected object if the object can contain children. For now, click on the clock to select it. We'll add a new object between the clock and the load meter group.
Click on the Add New Object button, and you will see a pop-up list of object types that can be added. Note that new object classes can be added to the program by anyone with programming knowledge, but for now scroll down until you find the Screenswitch (not Screenview!) class. Double click it. You'll see this new object appear in the list. Click on Edit... to edit it.
For this example, you will need to have another public screen open on your system. If you don't already, open one now using your favorite public screen utility (MUI's PSI works very well for this). In the Screen Name field of this editor, type the name of the public screen. Later, we'll learn how to make these objects dynamically, but for now, just type in the public screen name exactly.
Next, click on "Display". Click on the True Object button and add a Text object. You won't see any display (the text is empty), but edit the text with the edit button. Very carefully type in this string:
${ScreenName}
including the curley brackets and the dollar sign, with the same upper & lower case as used above. Accept the text object changes. For now, copy the text object to the False Object by dragging it over and letting go. This will clone the text into the other box. Before accepting the changes to the Screenswitch, give it a new background, in Object/Background by selecting Custom BG, clicking on the Background button, and selecting a background. (later we'll learn how to inherit backgrounds).
Now accept the changes to the Screenswitch, and the Layout box. You should see a button displaying your public screen name. Assuming this screen exists and is open, you can click on the button to switch to that screen.
Let's enhance this object we just made. You don't need to edit the entire window contents, just use the context menu to edit the Screenswitch. Go to the Display... tab. Replace the True Object with an object of type ScreenView. A Screenview displays a thumbnail view of other screens. We don't have to edit the Screenview for now; just accept all the way back out. Your Screenswitch will now display a thumbnail view of the other screen, when it is open, and the screen name when it is closed! Any object can be used, even a Layout group of other objects. This numbnail will update once a minute; that can be changed by editing it. Here is a screenview showing a screen displaying IBrowse and the top of this document.
 Note that these views are palette-remapped; you can show a thumbnail of a
16 bit truecolor screen on an 8 bit (256 color) screen, or vice versa, or
show a different screen even though it has a different palette. This
palette mapping is somewhat time consuming, and is done in a low priority
background task. Resizing these objects will only display the newly sized
thumbnail at the next update interval; this is because otherwise, resizing
would be too slow especially with a utility such as OpaqueMove that
provides opaque sizing. See the reference section on this class for other
important notes.
Note that these views are palette-remapped; you can show a thumbnail of a
16 bit truecolor screen on an 8 bit (256 color) screen, or vice versa, or
show a different screen even though it has a different palette. This
palette mapping is somewhat time consuming, and is done in a low priority
background task. Resizing these objects will only display the newly sized
thumbnail at the next update interval; this is because otherwise, resizing
would be too slow especially with a utility such as OpaqueMove that
provides opaque sizing. See the reference section on this class for other
important notes.