 For this tutorial, we won't need the main editor window, so you can hide
it by selecting Hide Window from its Project menu.
Note: Using the MUI Iconify gadget will iconfiy the entire
application, which usually isn't what you want in BarNone. In fact, it is
usually best to disable these gadgets for BarNone from the
Settings/MUI... menu in the main editor.
For this tutorial, we won't need the main editor window, so you can hide
it by selecting Hide Window from its Project menu.
Note: Using the MUI Iconify gadget will iconfiy the entire
application, which usually isn't what you want in BarNone. In fact, it is
usually best to disable these gadgets for BarNone from the
Settings/MUI... menu in the main editor.
First, we will edit one of the objects in the window. Press the right mouse button when the cursor is over the clock. You should see a pop-up context menu containing only an Edit Object... entry. Some objects have more complex context menus. Select this context menu item, and you should see the editor window for this clock object.
Important Note: All objects in BarNone have context menus, but you can still access the window's menu by right clicking with the cursor over a window border. Even borderless windows have a thin border! For some nested objects, the context menu for an object is not always available, so there are other ways to edit objects as well.
Click on the Test button at the bottom of the editor window, and you should see your changes reflected in the clock in the window. You should see the second hand, and the background color you specified. If you like what you see, select Accept to keep the changes. At any time, you can select Revert to revert back to the object's state before you began editing it.
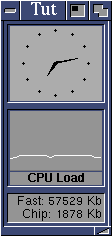
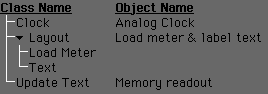 You'll see that this window contains, in order, the clock, another layout
box which groups the CPU load meter and its text label, and the memory
readout. The column on the left shows the object's class, and the column
on the right, its name. And object may be given any name; it is used
mostly for your reference, to make it easier to tell apart objects of the
same class. Some features that we'll see later in BarNone find
objects by their name. Also, the object name is sometimes used in error
reporting.
You'll see that this window contains, in order, the clock, another layout
box which groups the CPU load meter and its text label, and the memory
readout. The column on the left shows the object's class, and the column
on the right, its name. And object may be given any name; it is used
mostly for your reference, to make it easier to tell apart objects of the
same class. Some features that we'll see later in BarNone find
objects by their name. Also, the object name is sometimes used in error
reporting.
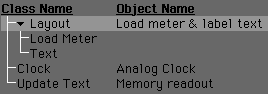
To accomplish this, drag the Layout object named Load meter & label
text, move it above the Clock object, and let it go. The new
structure should look like this.
 Now, select Test and you should see the window contents change to
reflect your new ordering. You can reorder objects by dragging as you
just did. If you have two Layout edit windows open, you can drag objects
from one to the other, which will make a copy of the dragged object in the
window you drop it on. There are a large number of drag & drop actions
supported in BarNone: see the reference section for more details.
Now, select Test and you should see the window contents change to
reflect your new ordering. You can reorder objects by dragging as you
just did. If you have two Layout edit windows open, you can drag objects
from one to the other, which will make a copy of the dragged object in the
window you drop it on. There are a large number of drag & drop actions
supported in BarNone: see the reference section for more details.
To illustrate an important point, leave this Update Text editor on the screen. This editor is actually editing a temporary copy of the update text, that will be copied back to the window if you select Accept or Test. However, as we saw in the previous section, it is also possible to edit an object in the Layout editor for its window. What happens in this case?
The answer is that editing the Window contents, and selecting Accept or Test, will copy the temporary contents from that editor back into the window. The old window contents is deleted when this happens, so if there are any object editors displayed, they will be closed. To see this, leave the Update Text window open. Edit the window contents again. Without making any changes, select Test. The Update Text editor window was closed when the object associated with it was overwritten.
With the Layout editor still displayed, click on the Update Text object labeled Memory readout to select it. Click on Edit.... Go to the Object tab, and again to the Appearence tab under it. All the gadgets are now accessable. This is because we are now editing the temporary copy, not the object directly in the window.
Click on the Background gadget to change the background for this object. Make sure the Custom BG box is selected, and then click on the Background box to bring up the background editor. Any background (even a datatypes bitmap file) may be used for any object. For now, just select a color or pattern than you like, and click OK. Accept the changes to the Update Text object, and then click on Accept for the window contents Layout. You should now see the memory readout with the new background you selected.